Single Sign-On, Azure Static Web Apps and Azure Active Directory
Custom auth for a specific AAD tenant, safely in a key vault

We often build and deploy web applications specifically for users internal to our organisation. Azure Static Web Apps is proving to be an excellent replacement for Azure App Service in these scenarios.
At a high-level the service provides you with a great set of features (outlined in the Azure release notes )
- Globally distributed content for production apps
- Tailored CI/CD workflows from code to cloud
- Auto-provisioned preview environments
- Custom domain configuration and free SSL certificates
- Built-in access to a variety of authentication providers
- Route-based authorization
- Custom routing
- Integration with serverless APIs powered by Azure Functions
- A custom Visual Studio Code developer extension
- A feature-rich CLI for local development
The desired experience?
The experience I wanted to achieve was that if one of our internal users browsed to any of our internal apps, they would be able to use SSO across them provided they were a member of the AAD group needed to access the app (or just a member of our tenant for organisation-wide apps) - no login button, just a seamless logged-in user experience.
It turns out this was super easy to get right! Follow below!
Authentication options
Azure Static Web Apps makes authentication easy to enable across the three pre-configured identity providers
- Azure Active Directory (AAD)
- Github or
These options allow users to login using a login button linking to the desired provider.
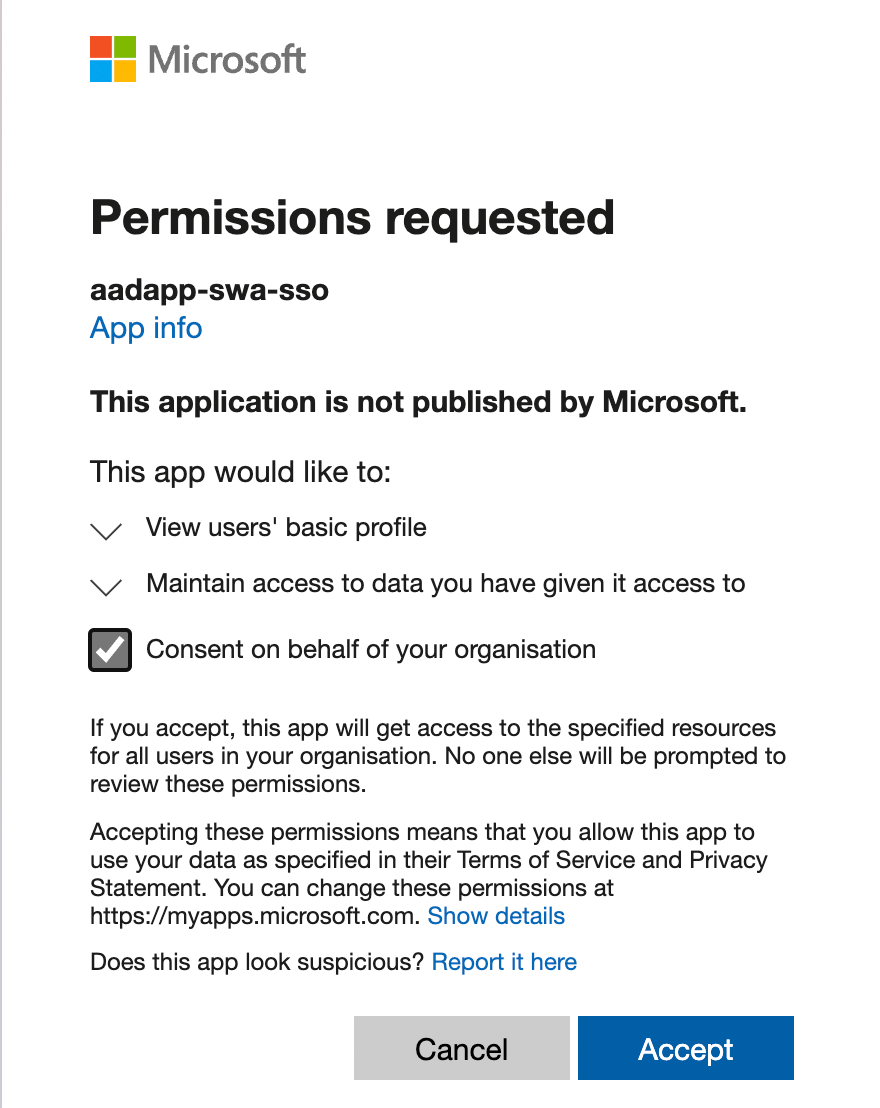
Initially I tried to use the pre-configured AAD provider, and when trying to log in using my company account I was presented with this approval dialogue
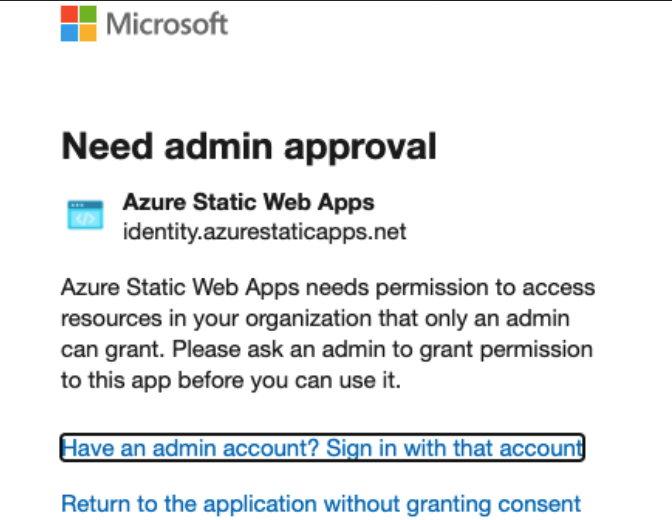
Meaning if I was able to get an admin to grant the permission, all users from our tenant would be able to log in to all Azure Static Web Apps, regardless of who had deployed them making this a non-starter for me.
Fortunately we already deploy our static web apps using the Standard plan for $9/per app/month , giving us the ability to use custom authentication and use SSO with our organisations AAD tenant, internal app registrations and restrict access to groups / users in our tenants directory.
Getting it done!
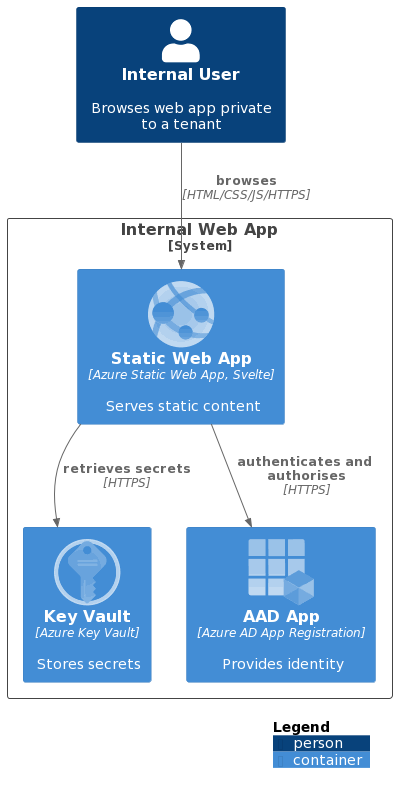
To achieve the desired experience there are a number of components required
- the static web app (the website)
- an Azure App Registration for your app in your tenant
- an Azure resource group for your project (I’m working on the assumption you already have a subscription, if not read here
)
- an Azure Static Web App for the web app
- an Azure Key Vault to safely store the secrets for your app
I will be showing you how to create, configure and deploy these using GitHub Actions , Bicep (for creating the Azure resources) and some once off scripts.
Initial setup and deployment
First we are going to scaffold our web app, define our infrastructure and deploy to Azure without any auth in place. Once done, we will move onto the configuration of the app with auth.
Scaffold the web app
For the purposes of this post, I needed a simple static web app and used the SvelteKit skeleton project with the static adapter .
| |
You need to update the default svelte.config.js to use the static adapter
, see an example here
.
Define the Azure Infrastructure
Resource Group
First, create an Azure resource group. For this tutorial I’m creating it manually from my terminal and Azure CLI
| |
Resources
We will be deploying a Static Web App as well as a Key Vault using Bicep. I’ve split out the Bicep files to make them easier to work with as follows (filenames link to the code on GitHub)
main.bicep- the main template that is deployed which makes use of the other templatesget-kv-secrets-refs.bicep- a helper to build up the Key Vault secret referenceskey-vault.bicep- defines the Key Vault resources and the role assignments neededstatic-sites.bicep- defines the Static Web App resources needed
In the main.bicep
there are the following highlights to make note of
- Configuring the static web app
- to have app settings that are Key Vault references (
AAD_CLIENT_ID,AAD_CLIENT_SECRET) - to use the
Standardsku
- to have app settings that are Key Vault references (
| |
- And configuring the key vault to allow the static web app permissions to read from it
| |
Deploy using GitHub
Deployment credentials
For a GitHub Action to be able to deploy to your resource group you need to have some form of deployment credentials. You can read about the options available here . I’ll be using the Service Principal approach with Azure CLI .
| |
You will get a JSON output from this that you can then save as a GitHub secret with the name AZURE_CREDENTIALS.
- Replace
{subscription-id}with the ID of your subscription - Replace
{resource-group-name}with the name of your resource group - I’ve made the service principal have Owner access to the resource group (so that I can assign roles).
Workflow token
Azure Static Web Apps needs access to your workflow when deploying. For this we’ll set up a WORKFLOW_TOKEN secret using a GitHub personal access token with the workflow scope. Follow the instructions here
to create the token.
Github Action Workflow
With the above secrets in place, we can now create a workflow (mines in .github/workflows/deploy.yaml
) which
- specifies some environment variables for names, tags and locations
- checks out the repo
- logs into Azure using
${{ secrets.AZURE_CREDENTIALS }} - deploys to the resource group using the
azure/CLI@v1action - gets the API from the deployed static web app (so that we can deploy code to it)
- deploys the webapp using the
Azure/static-web-apps-deploy@v1action
See the full workflow below.
| |
Finalising auth
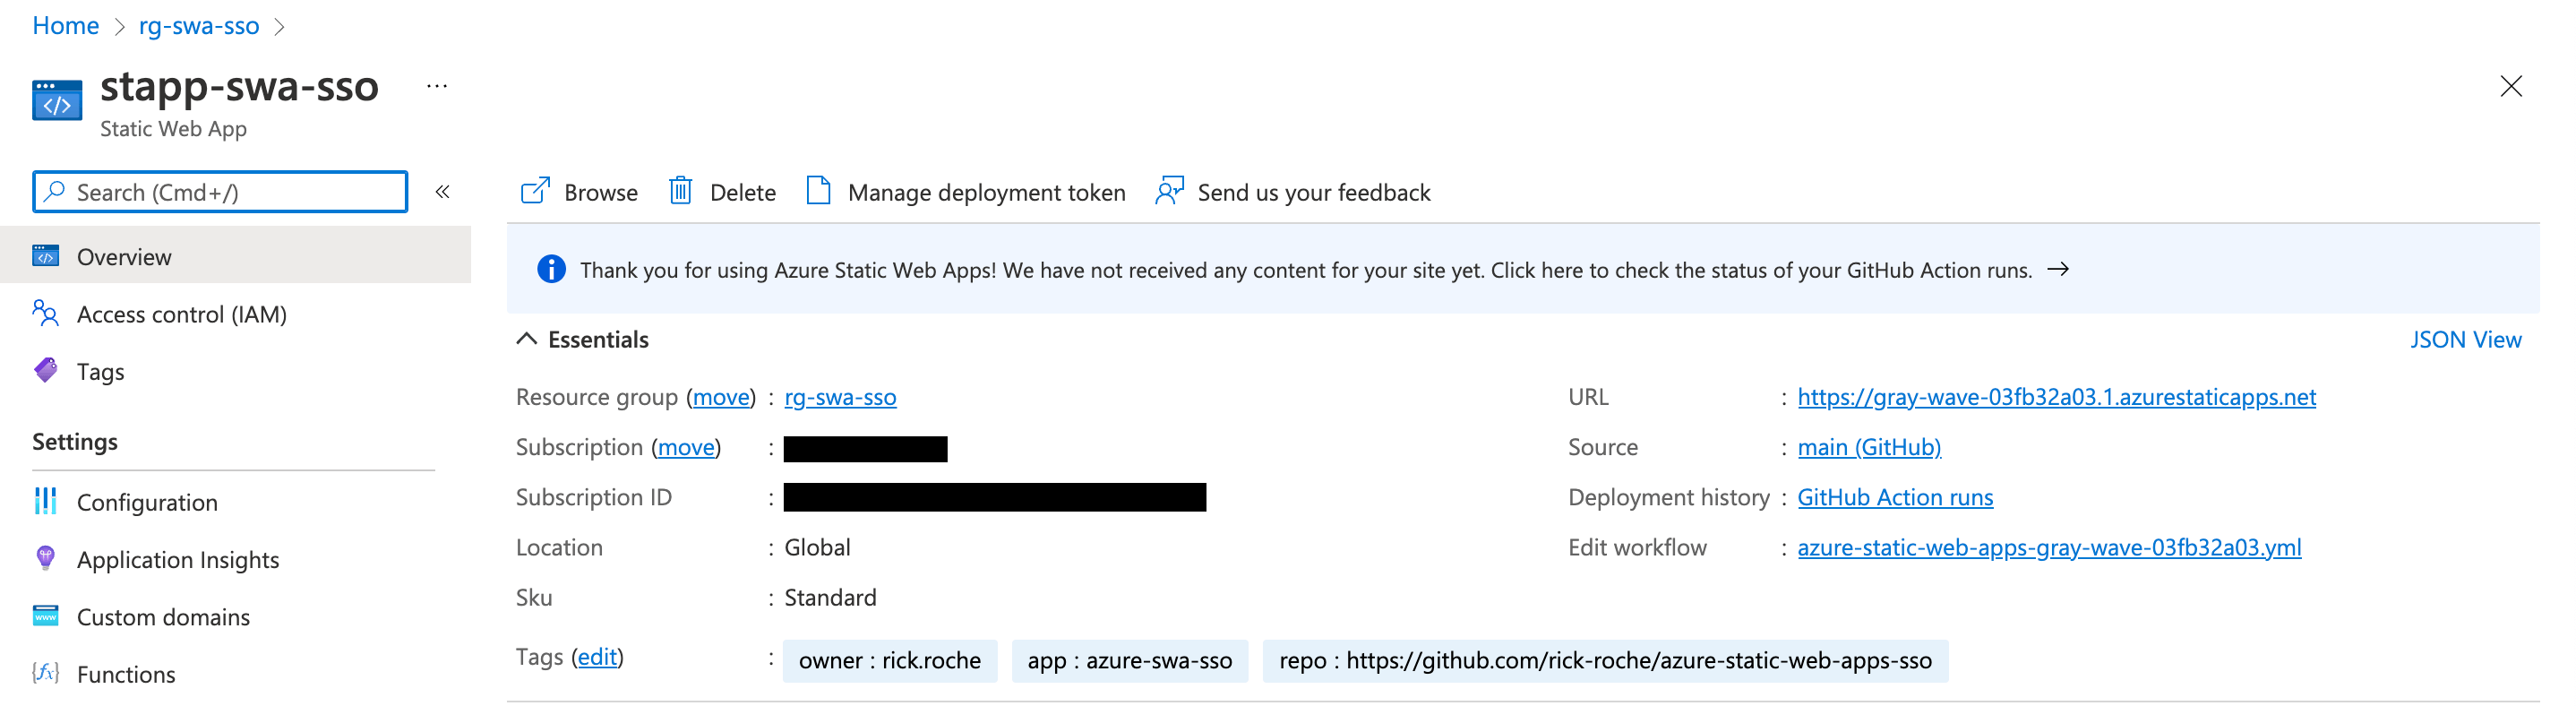
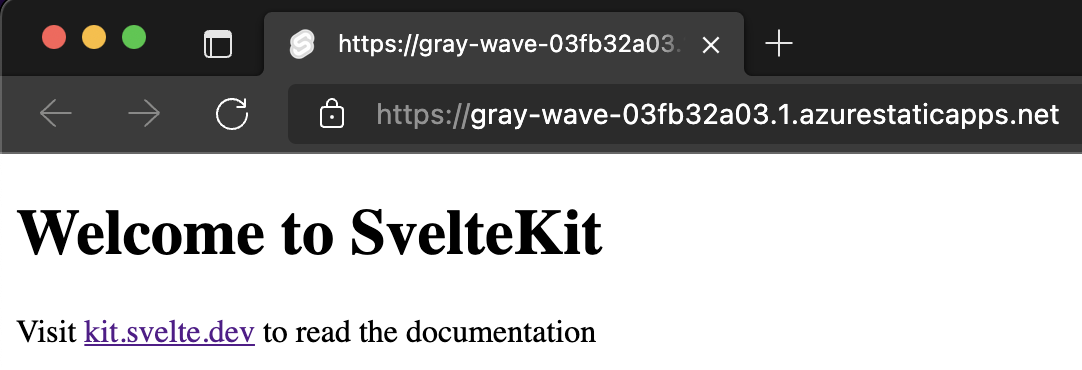
At this stage you should have a GitHub workflow successfully deploying a Static Web App and a Key Vault to you resource group. You should also be able to browse to your web app using the generated URL (navigate into the Static Web App from the portal, and you will see your URL on the overview tab. e.g. https://gray-wave-03fb32a03.1.azurestaticapps.net ).
To enable auth our next steps will be to
- create an AAD app registration
- add it’s client ID and secret as secrets in your key vault
- configure the static web app to auto log you in if you aren’t already or your token has expired
AAD App Registration
An AAD app registration allows us to bind our application to a desired set of authentication flows and restrictions. Think of it as giving your application an identity inside AAD. Mark Foppen wrote a lovely article that may help demystify this a bit.
In this tutorial I’ll just be using Azure CLI to create one:
| |
--reply-urls to be the generated URL of your app with the /.auth/login/aad/callback suffix. This allows AAD to call your app once the auth flow has completed.Once created, we need to create an application secret for the application. For this tutorial you can do this via the portal following the instructions here .
Copy the value of the secret as well as the Application (client) ID of the AAD app (found under the Overview section of the app).
Setup Key Vault Secrets
Once again, I’ve used the portal for this tutorial. You can follow the guide here setting two secrets in your vault
aadClientId- this should be set to the Application (client) ID of your app registrationaadClientSecret- this should be set to the value of the application secret created above
Configuring the Static Web App
Configuration for Azure Static Web Apps is defined in the staticwebapp.config.json
file, which controls, among other things, authentication and authorisation.
I’ve put mine in the root of the webapp folder and set it to do the following to enable the auto-login SSO magic
enable custom
authwith Azure Active Directory Version 2 using the app settings references from earlier (AAD_CLIENT_ID,AAD_CLIENT_SECRET)1 2 3 4 5 6 7 8 9 10 11"auth": { "identityProviders": { "azureActiveDirectory": { "registration": { "openIdIssuer": "https://login.microsoftonline.com/4af290c8-08df-440d-93db-cbac02bd9b19/v2.0", "clientIdSettingName": "AAD_CLIENT_ID", "clientSecretSettingName": "AAD_CLIENT_SECRET" } } } },a
navigationFallbackroute toindex.html1 2 3"navigationFallback": { "rewrite": "index.html" },specific rules for the apps
routescreates a
/loginroute redirecting to AAD allowing anonymous access1 2 3 4 5{ "route": "/login", "rewrite": "/.auth/login/aad", "allowedRoles": ["anonymous", "authenticated"] },blocks all providers except AAD
1 2 3 4 5 6 7 8{ "route": "/.auth/login/github", "statusCode": 404 }, { "route": "/.auth/login/twitter", "statusCode": 404 },creates a
/logoutroute redirecting to AAD allowing anonymous access1 2 3 4 5{ "route": "/logout", "redirect": "/.auth/logout", "allowedRoles": ["anonymous", "authenticated"] },enforces auth for all other routes (
/*)1 2 3 4{ "route": "/*", "allowedRoles": ["authenticated"] }
sets up a response override that if an unauthenticated user hits a page, they should be redirected to the
/loginroute1 2 3 4 5 6"responseOverrides": { "401": { "redirect": "/login", "statusCode": 302 } }
The combination of all of the above means that anyone accessing the site that isn’t logged in will be routed to the /login route which will ensure that the AAD auth flow is completed!
Finishing up!
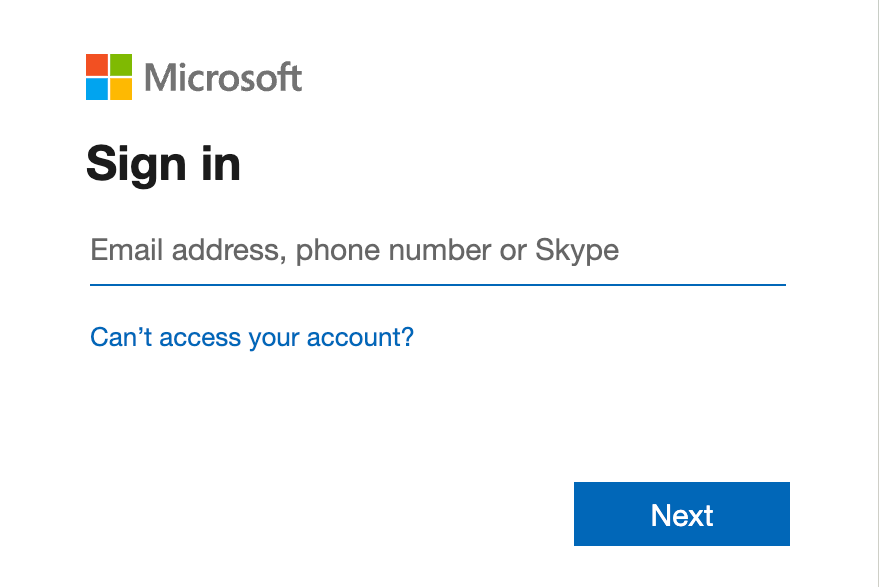
Commit all your outstanding changes, push to GitHub and watch your action deploy… once done, access your web app in the browser, and it should redirect you to login
Initially you will need to provide admin consent for your AD app registration to read the logged-in user details
If all has gone well you should see the default page after login completes
And that’s it! Hope you enjoyed this tutorial and that it helps you setup SSO for your Static Web Apps!
Featured image background by Hello I’m Nik on Unsplash